Effortlessly Setting Up A CyberArk (now Idira) PAM Self-Hosted Lab with AutomatedLab

If you want to learn CyberArk (now Idira) PAM self-hosted without risking your production environment or experiment with different configurations and test scenarios, setting up a personal lab environment is a great option. However, installing the Vault and its components can take up valuable time. Fortunately, with AutomatedLab and custom CyberArk roles, you can automate the entire process and focus on more important tasks. In this article, you will see how to deploy a CyberArk PAM self-hosted lab environment using AutomatedLab with Active Directory Domain Services.
What is AutomatedLab?
"AutomatedLab is a provisioning solution and framework that lets you deploy complex labs on HyperV and Azure with simple PowerShell scripts. It supports all Windows operating systems from 2008 R2 to 2022, some Linux distributions and various products like AD, Exchange, PKI, IIS, etc." [0]
AutomatedLab will provision virtual machines as well as install and configure the operating system. It provides PowerShell cmdlets by which you can easily install your software.
You can assign roles to machines which will result in services like Active Directory Domain Services, Exchange, or IIS being installed. AutomatedLab also provides methods for creating your own custom roles.
[0] https://github.com/AutomatedLab/AutomatedLab
Deploying CyberArk PAM self-hosted with AutomatedLab
AutomatedLab has a bit of a learning curve but provides documentation to help you get started. The remainder of this article assumes you have successfully installed your first lab as described in the documentation.
In addition, you need the installation archives from the CyberArk Marketplace as well as Operator/Master keys and a license file. These can be placed anywhere on your local machine but I have stored them under $LabSources\CyberArkInstallFiles.
Installing the custom CyberArk roles
Installation is nothing more than copying the folders representing the roles to $LabSources\CustomRoles .
- Check out the repository at https://github.com/aaearon/AutomatedLab.CyberArk
https://github.com/aaearon/AutomatedLab.CyberArk
- Copy all the folders starting with
PAMto\(LabSources\CustomRoles. On Windows, unless you changed it during the installation of AutomatedLab,C:\LabSourcesis used for\)LabSources.
The Vault and each component have their folder. PAMCommon contains common functions used among all the roles.
Creating the lab definition
We will use Hyper-V running locally and our lab will consist of four machines:
DC01 - the domain controller with Active Directory Domain Services.
VAULT01 - the CyberArk Vault.
COMP01 - the CyberArk Password Vault Web Access (PVWA) and CyberArk Central Policy Manager (CPM.)
PSM01 - the CyberArk Privileged Session Manager (PSM.)
We will have a switch with a defined address space to segregate our lab from other Hyper-V machines.
First, we create the lab definition, add our switch, and set some defaults so we do not need to repeat ourselves when defining the machines:
New-LabDefinition -Name PAM -DefaultVirtualizationEngine HyperV -VmPath C:\AutomatedLab-VMs

Add-LabVirtualNetworkDefinition -Name PAM -AddressSpace 192.168.0.0/24

$PSDefaultParameterValues = @{
    'Add-LabMachineDefinition:OperatingSystem'      = 'Windows Server 2019 Datacenter Evaluation (Desktop Experience)'
    'Add-LabMachineDefinition:Memory'               = 4GB
    'Add-LabMachineDefinition:Network'              = 'PAM'
}
Then define our domain controller with the 'RootDC' role and set the DomainName parameter to a domain name of our choice:
$DC01MachineProperties = @{
    Name = 'DC01'
    Roles = 'RootDC'
    DomainName = 'acme.corp'
}

Add-LabMachineDefinition @DC01MachineProperties
Defining the PAM-self hosted machines
For each of our CyberArk PAM self-hosted lab machines, we need to define role properties that will be used when installing the CyberArk software and the properties for the machine itself -- where we will specify the custom role as a PostInstallationActivity.
All the roles require the installation archive path to be defined. The Vault necessitates two folders to be specified – one for each of the Master and Operator key sets. The license in XML format is also needed. Furthermore, we can designate the Master and Administrator account passwords, but if we do not, they will both default to Cyberark1.
The other components require at least the Vault's IP address to be defined, and optionally, the username and password of the user for installation. If neither is specified, the default values of Administrator and Cyberark1 will be used.
All component servers will have DomainName defined, directing AutomatedLab to join them to our domain.
Our Vault is defined with:
$PAMVaultRoleProperties = @{
    InstallationArchivePath = 'C:\LabSources\CyberArkInstallFiles\Server-Rls-v13.0.zip'
    OperatorKeysFolder      = 'C:\LabSources\CyberArkInstallFiles\DemoOperatorKeys'
    MasterKeysFolder        = 'C:\LabSources\CyberArkInstallFiles\DemoMasterKeys'
    LicensePath             = 'C:\LabSources\CyberArkInstallFiles\nfr_license.xml'
}
\(PAMVaultRole = Get-LabPostInstallationActivity -CustomRole PAMVault -Properties \)PAMVaultRoleProperties

$PAMVaultMachineProperties = @{
    Name = 'VAULT01'
    IpAddress = '192.168.0.100'
    PostInstallationActivity = $PAMVaultRole
}

Add-LabMachineDefinition @PAMVaultMachineProperties
COMP01 hosts both the PVWA and CPM and is defined by:
Add-LabMachineDefinition @PAMVaultMachineProperties

$PAMPvwaRoleProperties = @{
    InstallationArchivePath = 'C:\LabSources\CyberArkInstallFiles\Password Vault Web Access-Rls-v13.0.zip'
    VaultIpAddress          = '192.168.0.100'
}
\(PAMPvwaRole = Get-LabPostInstallationActivity -CustomRole PAMPvwa -Properties \)PAMPvwaRoleProperties

$PAMCpmRoleProperties = @{
    InstallationArchivePath = 'C:\LabSources\CyberArkInstallFiles\Central Policy Manager-Rls-v13.0.zip'
    VaultIpAddress          = '192.168.0.100'
}
\(PAMCpmRole = Get-LabPostInstallationActivity -CustomRole PAMCpm -Properties \)PAMCpmRoleProperties

$COMP01MachineParameters = @{
    Name = 'COMP01'
    DomainName = 'acme.corp'
    PostInstallationActivity = \(PAMPvwaRole,\)PAMCpmRole
}

Add-LabMachineDefinition @COMP01MachineParameters
Finally, our PSM is:
$PAMPsmRoleProperties = @{
    InstallationArchivePath = 'C:\LabSources\CyberArkInstallFiles\Privileged Session Manager-Rls-v13.0.1.zip'
    VaultIpAddress          = '192.168.0.100'
}
\(PAMPsmRole = Get-LabPostInstallationActivity -CustomRole PAMPsm -Properties \)PAMPsmRoleProperties

$PSM01MachineParameters = @{
    Name = 'PSM01'
    DomainName = 'acme.corp'
    PostInstallationActivity = $PAMPsmRole
}

Add-LabMachineDefinition @PSM01MachineParameters
Installing the lab
As the Vault hardening removes the ability for AutomatedLab to communicate with the machine over WinRM, we cannot simply invoke Install-Lab rather we need to install in stages.
First, we do everything but the post-installation activities:
Install-Lab -BaseImages -NetworkSwitches -VMs -Domains -NoValidation
After, we have use Invoke-LabCommand to install CyberArk PAM-self hosted installed.
# Perform the Vault installation. The hardening part of the installation will kill the ability to use WinRM so it will timeout and throw an error. We want to ignore that error.
Invoke-LabCommand -ComputerName VAULT01 -PostInstallationActivity -ActivityName 'CyberArk Vault installation' -ErrorAction SilentlyContinue
Invoke-LabCommand -ComputerName COMP01 -PostInstallationActivity -ActivityName 'CyberArk Pvwa and CPM installation'
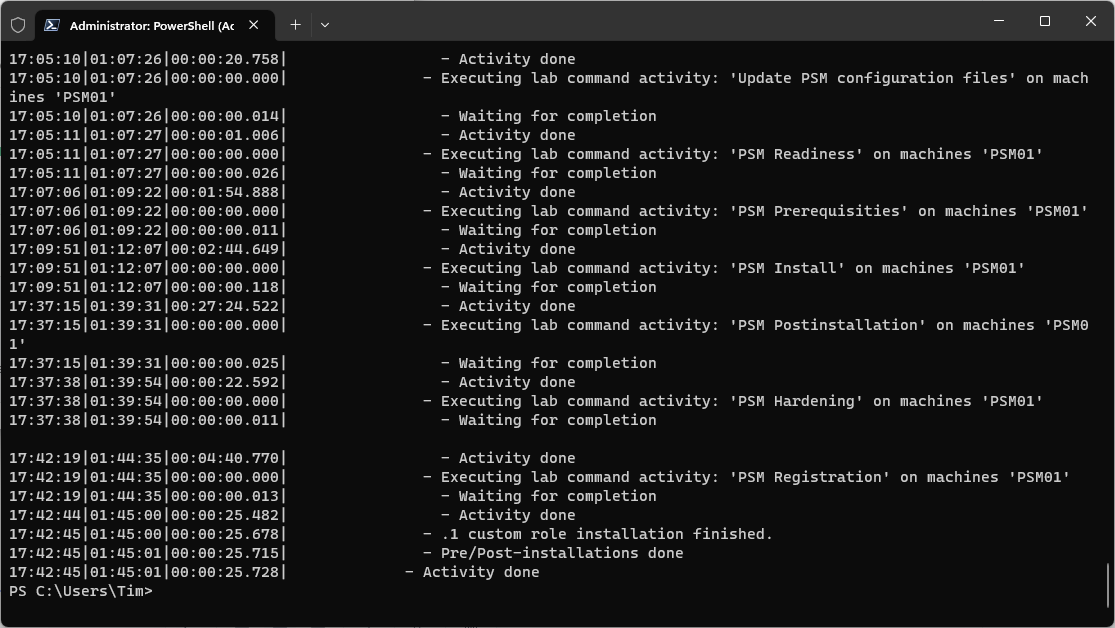
Invoke-LabCommand -ComputerName PSM01 -PostInstallationActivity -ActivityName 'CyberArk PSM installation'
The entire lab definition can be found below:
https://gist.github.com/aaearon/d584a11f09efa21091785b1bf129c6a9
A little less than two hours later (depending on the resources allocated to each machine), a complete CyberArk PAM self-hosted lab environment is fully operational and ready for use.
Elevating our lab
We did little more than the bare minimum to get our lab environment off the ground however with all the different functionality AutomatedLab provides plus the ability to write custom roles, we can take it much further.
We could have our domain controller serve as a certificate authority and then issue a certificate and configure the HTTPS binding in IIS. We could also execute a script that creates safes and onboard accounts after the installation of the components.