Creating a CyberArk (now Idira) Central Policy Manager plugin for a web application

In a previous article, we developed a Microsoft Edge-based CyberArk (now Idira) Privileged Session Manager connection component for the web application Shopizer and with the knowledge we gained, we will create a Central Policy Manager plugin for a web application to manage the password of Shopizer administrator users.
Note: You can find the platform files for the Shopizer administrator user CPM plugin at https://github.com/aaearon/cyberark-shopizer-admin-extensions, including a docker-compose.yml file that can be used to quickly stand up your own Shopizer environment.
Understanding what a CPM plugin for a web app is doing
A CPM plugin for a web application works fundamentally the same as a PSM connection component for a web application.
The Web Application CPM Plugin Framework uses a WebDriver to identify and interact with elements in a web page's DOM based on a set of commands that represent the verify, change, and reconcile operations. We already covered WebDrivers and the DOM in more depth when we created a PSM connection component.
But instead of using the WebFormFields property, we use WebFormFieldsFile -- an .ini file -- that will hold the commands for each CPM operation. This file will live in the bin folder of the Central Policy Manager and the CPM plugin framework will parse and perform the commands contained.
A closer look at a WebFormFieldsFile
With an out of the box installation of the CPM there is no WebFormFieldsFile in the bin folder but the documentation tells us what it looks like (step 6): an .ini file with three sections -- verify, change, and reconcile.
[Verify]
# Verify commands go here, i.e. username > {username} (searchby=name)
[Change]
# Change commands go here
[Reconcile]
# Reconcile commands go here
The .ini file can be named anything so we want to make sure it is something unique and meaningful.
Developing our Shopizer CPM plugin
We already understand how to identify and select the best DOM elements so we can jump right in with creating our CPM plugin. The Create CPM plugins for Web applications documentation has pretty explicit instructions for creating the platform.
Setting the stage
Before creating the platform, we will create two administrator users in Shopizer for the purpose of development: shopizeradministrator@timschindler.dev and reconcile@timschindler.dev -- both with full administrator rights. The shopizeradministrator user will be the shared user and reconcile will serve as the reconciliation account for it.
Creating a new web application platform
Picking up at step 5 of the documentation for configuring platforms for web applications, we need to define VerifyURL, ChangeURL, ReconcileURL, and WebFormFieldsFile for our newly created platform.
The VerifyURL, ChangeURL, and ReconcileURL parameters function the same as to that of LogonURL for PSM connection components for web apps: before executing the commands in the WebFormFieldsFile, the framework navigates to the URL for the relevant section. We can use dynamic parameters corresponding to account properties as part of the parameters, too ({Address}, {Port}, etc.)
The WebFormFieldsFile property will hold the name of the file with all the operations' commands. For our CPM plugin used to manage Shopizer administrators, we will name the file ShopizerAdministrator.ini.
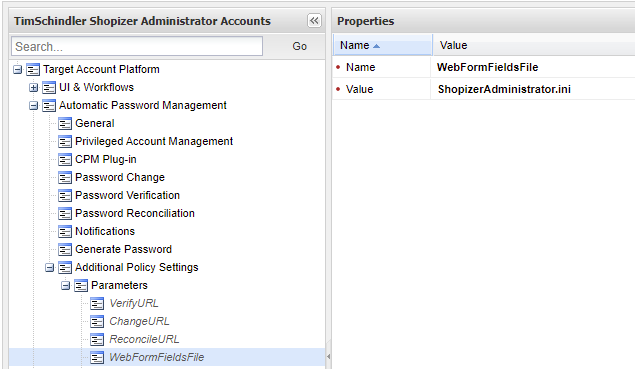
We will keep the default values for the parameters, changing only BrowserPath and adding the parameter Browser with a value of Edge to reflect the fact we will use Microsoft Edge. We set EnforceCertificate to No as our Shopizer development environment does not have a valid TLS certificate (but we would want to change this to Yes for production.) We will leave the VerifyURL, ChangeURL, and ReconcileURL parameters for the time being as we will set them at same time we define the commands for the CPM operations in ShopizerAdministrator.ini. Our last change will be defining the value for the Port parameter as 4200 -- the port our Shopizer administrator portal is running as -- under Additional Policy Settings.
With our (incomplete) platform created, we can onboard our two Shopizer accounts into CyberArk.

Crafting ShopizerAdministrator.ini
For each operation, we need to determine:
All the DOM elements that need to be interacted with to perform the operation. We need these for the commands.
The appropriate URL to start the commands at for the particular operation (
VerifyURL,ChangeURL, andReconcileURL.)
Important to note: Unlike a PSM connection component where we can disable validations, CPM plugins for web applications require at least one validation per operation so that the CPM knows if it was successful or not.
Verify section
As a verify operation is simply logging into the website with the vaulted credentials, we can simply re-use what we already have from our Shopizer PSM connection component plus add the required validation.
This results in our ShopizerAdministrator.ini file looking like:
[Verify]
username>{Username} (SearchBy=name)
password>{Password} (SearchBy=name)
//button[@type="submit"]>(Button) (SearchBy=XPath)
Informations sur le magasin>(Validation) (SearchBy=text)
Store information>(Validation) (SearchBy=text)
Note that, unlike the WebFormFields for a PSM connection component, we must not escape any brackets. And because the default Shopizer language is French, we search for the text 'Store information' or 'Informations sur le magasin' to validate we have logged in successfully.
We can also use the same value for LogonURL that we used in our PSM connection component for VerifyURL in our platform however we will not hard code the port and instead use a dynamic parameter, resulting in the final value being http://{Address}:{Port}/#/auth .
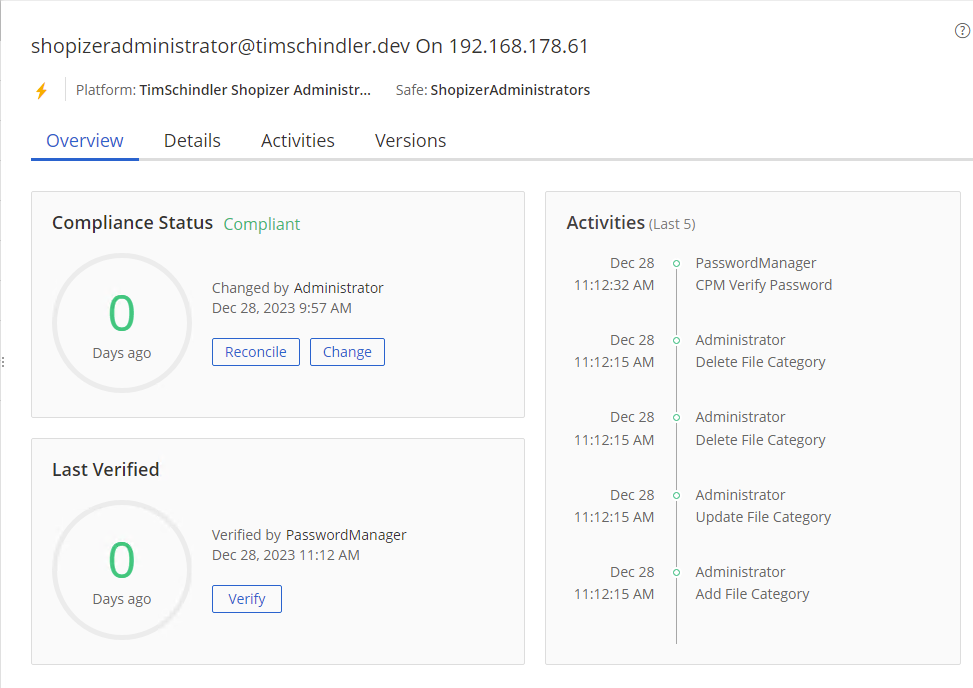
Clicking Verify in the PVWA, we see a successful verify operation.
Change section
For a Shopizer administrator user to change their own password, they need to:
Login to the Shopizer administrator portal.
Navigate to their profile.
Click Change Password from the pulldown.
Enter the current password, the new password, the new password again, and hit save.
To simplify the commands in our Change section, we will use http://{Address}:{Port}/#/auth as ChangeURL and then use the Navigate command to have the browser go directly to where we can change the password, http://{Address}:{Port}/#/pages/user-management/change-password.
This results in our Change section looking like:
[Change]
username>{Username} (SearchBy=name)
password>{Password} (SearchBy=name)
//button[@type="submit"]>(Button) (SearchBy=XPath)
Informations sur le magasin>(Validation) (SearchBy=text)
Store information>(Validation) (SearchBy=text)
(Wait=1)
(Navigate=http://{Address}:{Port}/#/pages/user-management/change-password)
password>{password} (SearchBy=id)
newPassword>{newpassword} (SearchBy=id)
confirmNewPassword>{newpassword} (SearchBy=id)
//button[text()=' Save ' or text()=' Sauvegarder ']>(Click) (SearchBy=xpath)
correctement>(Validation) (SearchBy=text)
Password successfully changed>(Validation) (SearchBy=text)
There is a lot going on so lets break it apart.
username>{Username} (SearchBy=name)
password>{Password} (SearchBy=name)
//button[@type="submit"]>(Button) (SearchBy=XPath)
Informations sur le magasin>(Validation) (SearchBy=text)
Store information>(Validation) (SearchBy=text)
The first lines are a copy and paste of our Verify section as we need to login first.
(Wait=1)
(Navigate=http://{Address}:{Port}/#/pages/user-management/change-password)
We use a Wait to break the validation context and then use Navigate to go directly to the profile page where we can change the password.
password>{password} (SearchBy=id)
newPassword>{newpassword} (SearchBy=id)
confirmNewPassword>{newpassword} (SearchBy=id)
//button[text()=' Save ' or text()=' Sauvegarder ']>(Click) (SearchBy=xpath)
After entering the current password and the new password twice we search for a button that has either the text Save or Sauvegarder , which is the Save button for changing the password, because the site may load in either English or French.
correctement>(Validation) (SearchBy=text)
Password successfully changed>(Validation) (SearchBy=text)
Our validations cover the Toast notification that briefly pops up when the password is changed successfully. What isn't visible in our WebFormFieldsFile is a necessary tweak to the ActionTimeout value.
ActionTimeout determines how long to wait for a command or an action to complete. When the command is clicking on a button, the framework expects the button to disappear from the page as part of the action completing. The framework will wait up to the value of ActionTimeout before proceeding with the next command.
Because a successful change does not result in the Save button disappearing and the Toast disappears after 3 or 4 seconds, we have to adjust ActionTimeout in our platform to 2 so that the validations can catch the Toasts before they are gone.
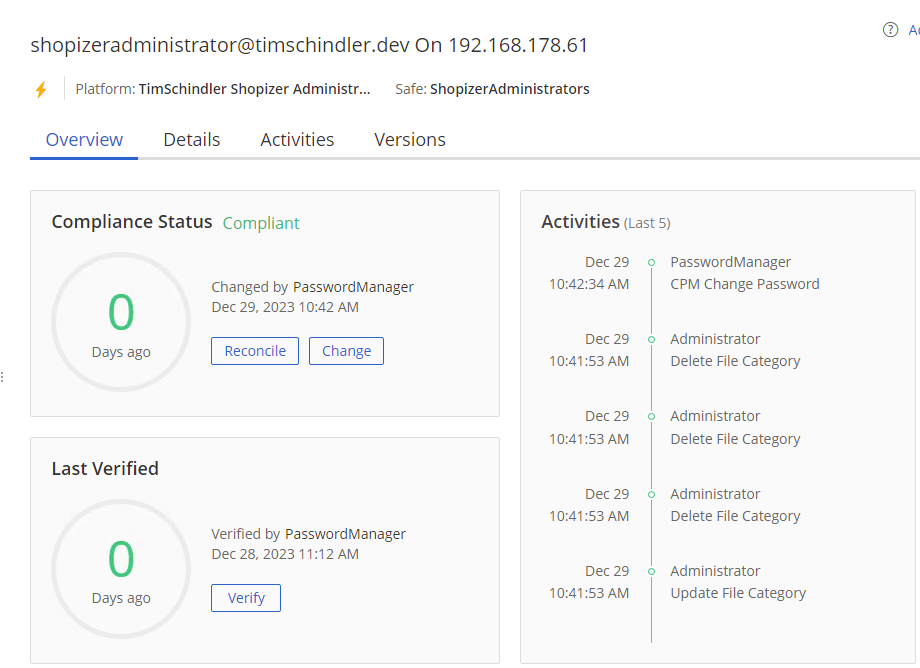
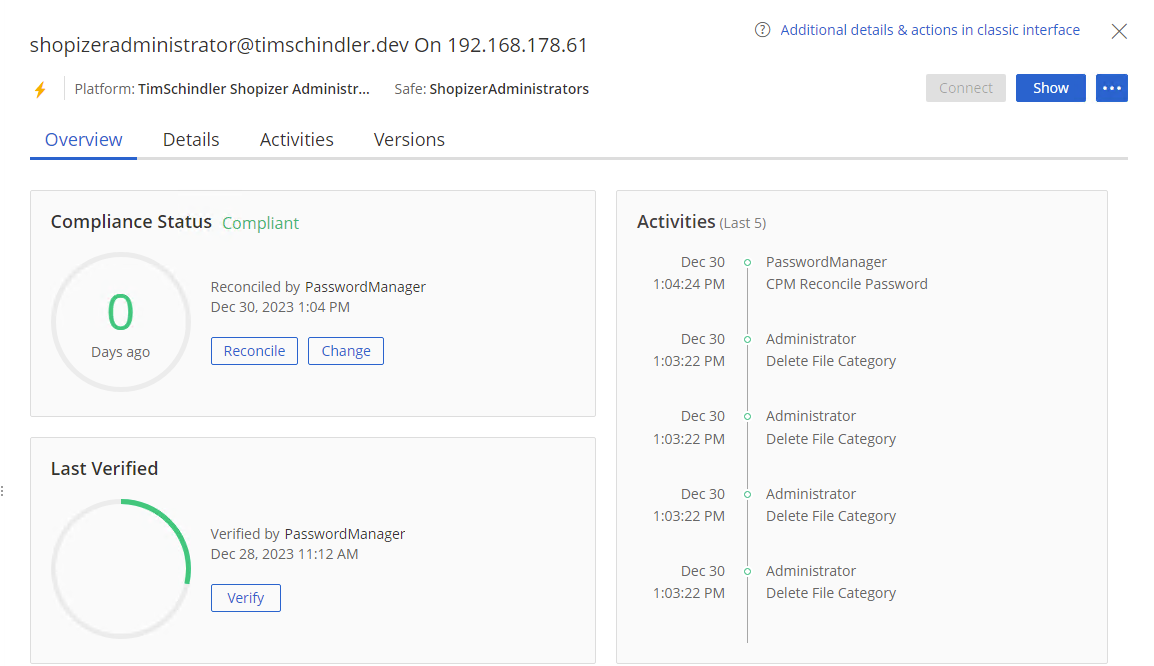
The account's password is rotated after clicking Change in the PVWA.
Reconcile section
Reconcile will be similar to change in that for Shopizer administrators to change the password for another user, they need to:
Login to the Shopizer administrator portal.
Navigate to the Users list.
Find the user in the list and edit their details.
Enter the new password, repeat the new password again, and hit Save.
Like the Change section, our Reconcile section will use http://{Address}:{Port}/#/auth as ReconcileURL and then use Navigate to navigate directly to the Users list, http://{Address}:{Port}/#/pages/user-management/users.
Our Reconcile section results in:
[Reconcile]
username>{reconcileaccount\username} (SearchBy=name)
password>{reconcileaccount\password} (SearchBy=name)
//button[@type="submit"]>(Button) (SearchBy=XPath)
Informations sur le magasin>(Validation) (SearchBy=text)
Store information>(Validation) (SearchBy=text)
(Wait=1)
(Navigate=http://{Address}:{Port}/#/pages/user-management/users)
//tbody//tr//td[3]//div[text()="{username}"]/ancestor::tr/td[5]//i>(Click) (Searchby=XPath)
password>{newpassword} (SearchBy=id)
repeatPassword>{newpassword} (SearchBy=id)
//button[text()=' Save ' or text()=' Sauvegarder ']>(Click) (SearchBy=xpath)
utilisateur>(Validation) (SearchBy=text)
User updated>(Validation) (SearchBy=text)
Like for Change, lets break it down into manageable pieces:
username>{reconcileaccount\username} (SearchBy=name)
password>{reconcileaccount\password} (SearchBy=name)
//button[@type="submit"]>(Button) (SearchBy=XPath)
Informations sur le magasin>(Validation) (SearchBy=text)
Store information>(Validation) (SearchBy=text)
The first lines are a copy and paste of our Verify and Change sections as however we need to login with the reconcile account so we use {reconcileaccount\username} and {reconcileaccount\password} instead of {username} and {password}.
(Wait=1)
(Navigate=http://{Address}:{Port}/#/pages/user-management/users)
Again, we use a Wait to break the validation context and then use Navigate to go directly to the Users list.
//tbody//tr//td[3]//div[text()="{username}"]/ancestor::tr/td[5]//i>(Click) (Searchby=XPath)
This is the most complex part of our CPM plugin.
The XPath expression identifies the Edit user "button" (in actuality it is an image) used to navigate to a user's details by looking for a <div> element with text content that matches the account's username within the third column (<td>) of a table row in the User's list table. Then, it goes up to the parent row (<tr>) and selects the fifth column (<td>), and finally, it searches for an <i> element anywhere within that fifth column (<td>).
Once found, it clicks on the image to navigate to that user's details page where the password can be updated.
password>{newpassword} (SearchBy=id)
repeatPassword>{newpassword} (SearchBy=id)
//button[text()=' Save ' or text()=' Sauvegarder ']>(Click) (SearchBy=xpath)
The new password is entered twice and the Save button is clicked.
utilisateur>(Validation) (SearchBy=text)
User updated>(Validation) (SearchBy=text)
Similar to changing a password, once we click Save, a toast pops up informing us that the user is updated. As ActionTimeout is already set to 2, the framework spots the notification and the reconciliation should be considered successful.
Let's give it a shot.
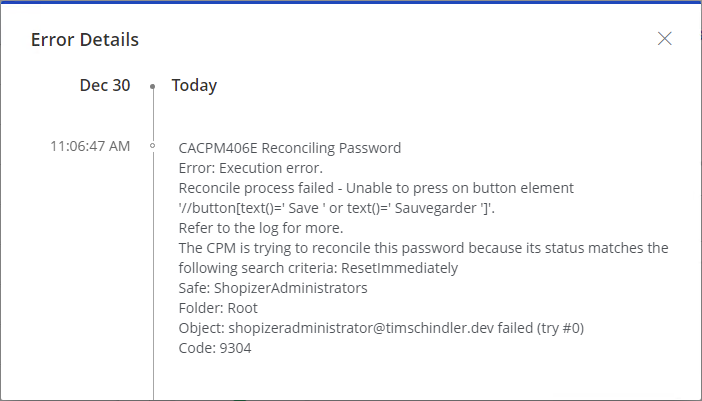
Unlike our Verify and Change operations, Reconcile isn't working on the first attempt.
The error message says it cannot press on the Save button, which is different from being unable to find the button. Digging in the Debug logs, we see the following error:
30/12/2023 11:06:47.438 | ERROR -> WebElementWrapper :: Click -> Failed to press on button. Exception Details: OpenQA.Selenium.ElementClickInterceptedException: element click intercepted: Element <button _ngcontent-dex-c30="" class="success_button appearance-filled size-medium status-basic shape-rectangle nb-transition" nbbutton="" nbspinnersize="large" nbspinnerstatus="control" type="button" _nghost-dex-c4="" aria-disabled="false" tabindex="0">...</button> is not clickable at point (1036, 20). Other element would receive the click: <div _ngcontent-dex-c16="" class="user-container">...</div> (Session info: MicrosoftEdge=120.0.2210.91)
The significant part is at the end: Other element would receive the click: <div _ngcontent-dex-c16="" class="user-container">...</div> .
The framework is telling us that it could not click the Save button that it found at an earlier position because now another element is on top of it.
At this point, we need to see how the framework is interacting with the page and unlike with PSM connection components, we cannot easily flip on switch to see the operations (EnableTrace=yes) but we can test the plugin manually without having to invoke an operation in CyberArk.
Troubleshooting Reconcile by testing the CPM plugin
Testing a CPM plugin is already well documented by CyberArk. As we already have our WebFormFieldsFile, we just need to create a user.ini file that will hold the parameters sent to the CPM plugin as part of our testing.
Our user.ini file -- which I've named shopizeruser.ini as there is no requirement around the filename -- looks like:
[targetaccount]
username=shopizeradministrator@timschindler.dev
newpassword=Password2
password=Password1
safename=Safename
foldername=Foldername
objectname=Objectname
PolicyID=Policyid
Address=192.168.178.61
Port=4200

[extrapass3]
username=reconcile@timschindler.dev
password=Password1

[extrainfo]
VerifyURL=http://{Address}:{Port}/#/auth
ChangeURL=http://{Address}:{Port}/#/auth
ReconcileURL=http://{Address}:{Port}/#/auth
WebFormFieldsFile=ShopizerAdministrator.ini
RunVerifyAfterChange=No
RunVerifyAfterReconcile=No
ActionTimout=2
PageLoadTimeout=30
EnforceCertificate=No
Debug=Yes
BrowserPath=C:\Program Files (x86)\Microsoft\Edge\Application\msedge.exe
Browser=Edge
The targetaccount section holds parameters related to the account we are testing with, extrapass3 has parameters relating to a reconcile account, and extrainfo has the same parameters and values as defined in our platform.
Note: The values for the safename, foldername, objectname, and policyid parameters are irrelevant for our testing but are required as they are used to form the name of the log file found in the Logs\ThirdParty folder.
With shopizeruser.ini saved to the root of the Password Manager folder, we can test the CPM plugin. Let's start with an operation we know works -- verify:
.\bin\CANetPluginInvoker.exe shopizeruser.ini verifypass CyberArk.Extensions.Plugin.WebApp.dll True
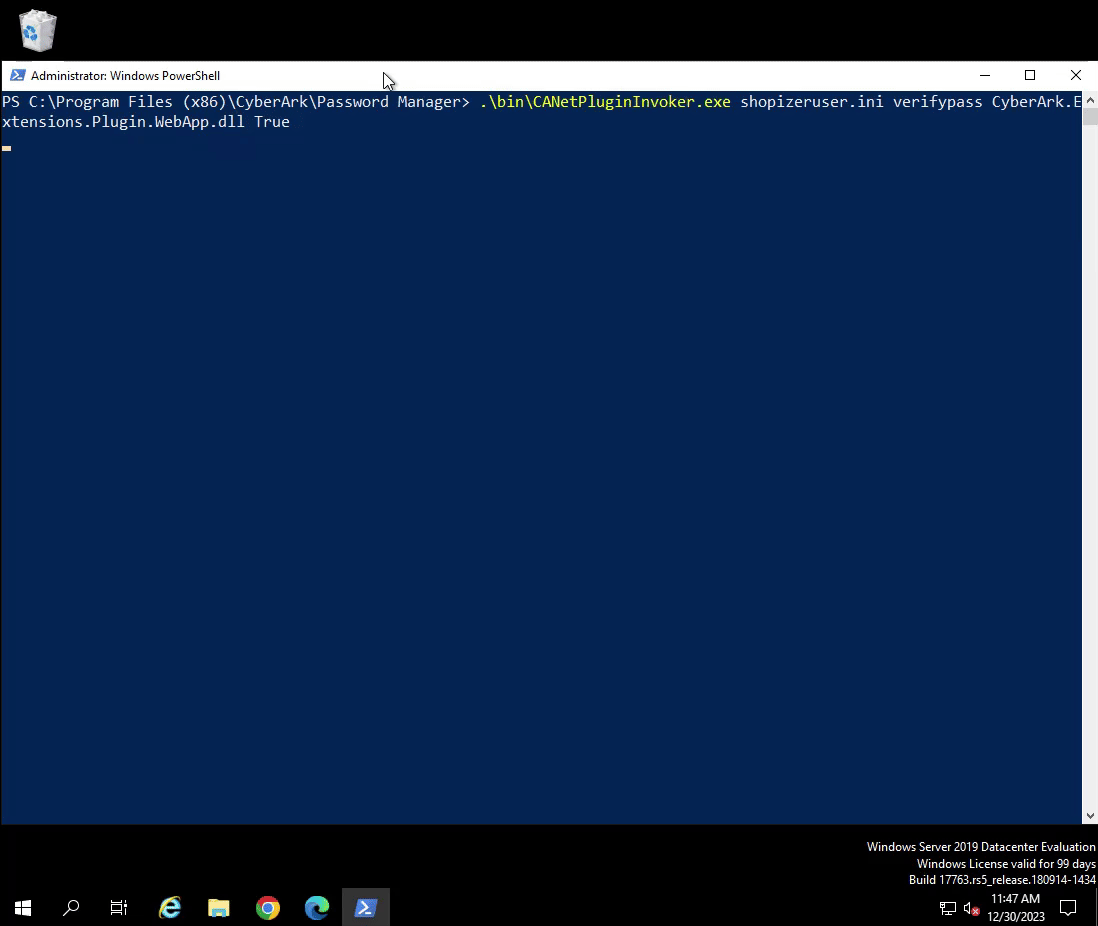
The plugin ends with error code 0, which is the error code returned when the operation is successful.
We know we have a working test setup so let's proceed with reconcile, with the expectation that it will fail:
Reconcile works when we test but not when the CPM invokes the plugin.
It's a nice confirmation that our commands for the CPM plugin are correct but we need to understand why we get different results.
Because the error message we received mentions that another element would receive the click, it's worth opening the User details page in a normal Edge browser and experiencing the page when navigating around it. It is also important to change the browser window size as we are not sure what the window size is when the CPM invokes the plugin.
At the resolution we are connected to the CPM with and the browser maximized, at no point is the Save button not visible. It's only when we put the browser in windowed mode is the Save button not visible after we focus on the Password and Repeat Password fields.
Resizing our RDP window to a smaller resolution and testing the plugin once more, we can reproduce the error that we originally received:
Checking the Debug log, we see:
30/12/2023 12:44:47.066 | ERROR -> WebElementWrapper :: Click -> Failed to press on button. Exception Details: OpenQA.Selenium.ElementClickInterceptedException: element click intercepted: Element <button _ngcontent-bkl-c30="" class="success_button appearance-filled size-medium status-basic shape-rectangle nb-transition" nbbutton="" nbspinnersize="large" nbspinnerstatus="control" type="button" _nghost-bkl-c4="" aria-disabled="false" tabindex="0">...</button> is not clickable at point (792, 20). Other element would receive the click: <div _ngcontent-bkl-c16="" class="user-container">...</div>
The message details differ slightly but it still complains about another element receiving the click. We can reasonably assume that when the framework focuses on the Password and New Password fields to enter text, the browser window no longer shows the Save button because the floating header is covering it.
How can we move the browser window to the top of the page?
With the framework, there is no command we can define in our WebFormFieldsFile to have the browser scroll to the top of the page. Furthermore, we cannot send keys outside of an input field so we could not simply instruct the framework to hit the Home key.
Fixing the Reconcile operation
The solution to fixing the Reconcile operation isn't elegant.
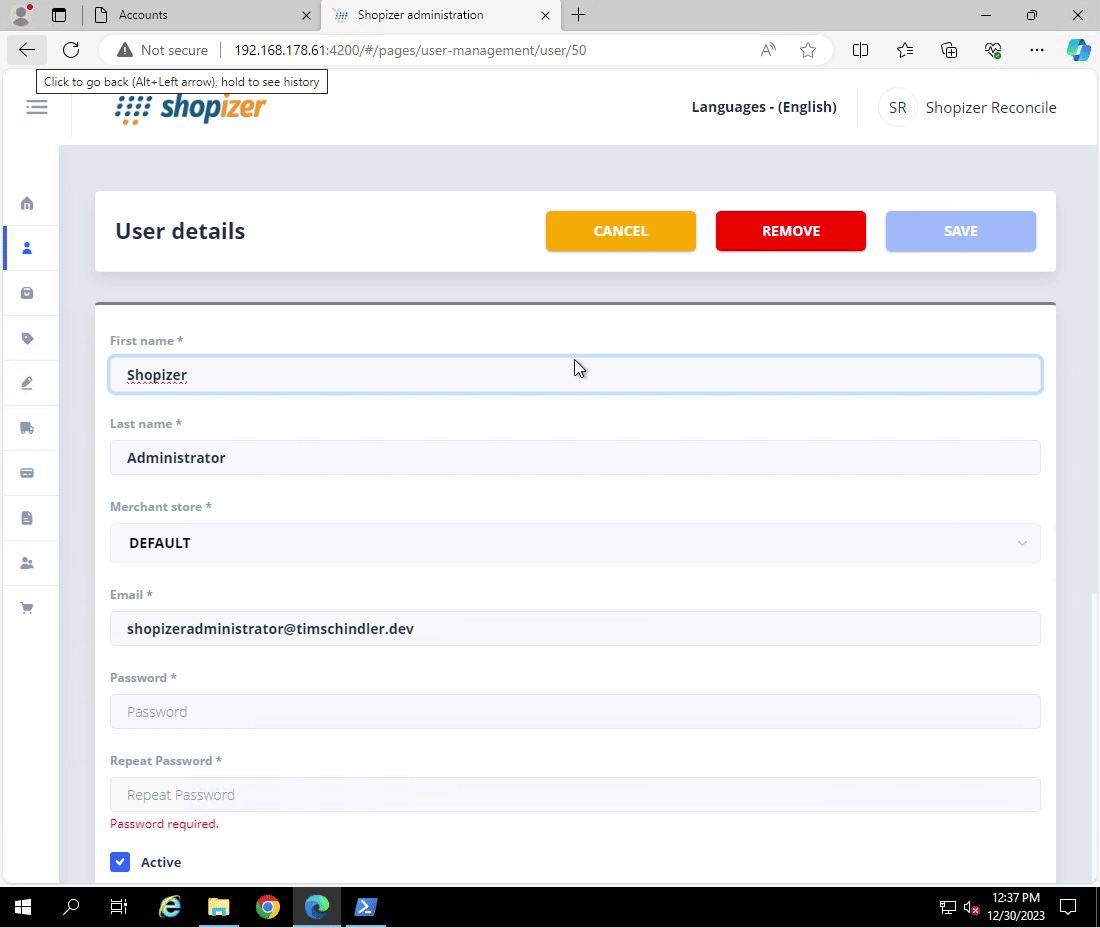
We know the browser scrolls to an input field when text is being entered so we need to enter text in the First name field. This will result in the browser 'scrolling up' and the header not covering the Save button.
Because we use Shopizer as the First name for our Shopizer users and the value of this user property is irrelevant, we can have commands to send Shopizer to the First name field before trying to click the Save button. The relevant part of our Reconcile section transforms to:
password>{newpassword} (SearchBy=id)
repeatPassword>{newpassword} (SearchBy=id)
firstname>Shopizer (SearchBy=id)
//button[text()=' Save ' or text()=' Sauvegarder ']>(Click) (SearchBy=xpath)
Testing our reconcile operation, we see a success:
But what matters is if it is successful when the CPM invokes the plugin.
Adding the command to populate the First name field so that the browser would have the Save button in view worked!
Our final Reconcile section is:
[Reconcile]
username>{reconcileaccount\username} (SearchBy=name)
password>{reconcileaccount\password} (SearchBy=name)
//button[@type="submit"]>(Button) (SearchBy=XPath)
Informations sur le magasin>(Validation) (SearchBy=text)
Store information>(Validation) (SearchBy=text)
(Wait=1)
(Navigate=http://{Address}:{Port}/#/pages/user-management/users)
//tbody//tr//td[3]//div[text()="{username}"]/ancestor::tr/td[5]//i>(Click) (Searchby=XPath)
password>{newpassword} (SearchBy=id)
repeatPassword>{newpassword} (SearchBy=id)
firstname>Shopizer (SearchBy=id)
//button[text()=' Save ' or text()=' Sauvegarder ']>(Click) (SearchBy=xpath)
utilisateur>(Validation) (SearchBy=text)
User updated>(Validation) (SearchBy=text)
Next steps
Our CPM plugin for Shopizer administrator users works but there are some improvements that can be made before rolling out to production:
Each operation should include Failure commands so that meaningful error messages can be shown in the PVWA.
We should change
EnforceCertificatetoYesafter securing all our Shopizer administrator portals with trusted TLS certificates.Evaluate if using the Web App framework is the best solution. The Shopizer administrator portal leverages REST APIs and our CPM plugin would be less prone to breaking if we call the endpoints directly.
If you are interested in developing your own CPM plugin for Shopizer administrator users, you can use this docker-compose.yml to quickly stand up a containerized Shopizer environment. Check out the README for more information. The same GitHub repository contains the platform files and WebFormFieldsFile.