Changing CyberArk (now Idira) platform properties with PowerShell

Last year my organization needed to update all platforms to generate longer passwords and have a new, optional description property. With nearly 200 platforms, doing this by hand would have been time-intensive and error prone but after discovering how platforms are stored this turned out to be easier than expected.
Though the CyberArk (now Idira) API is extended with new functionality each and every release, as of version 12.2, there is still no way to use it to change a platform's properties but because platforms are stored in the Vault, changing them programmatically is straightforward using PowerShell.
Note: Editing platforms this way is likely not supported by CyberArk and be sure to try this first in your non-production environments!
Platforms explained
Like many CyberArk artifacts, a platform is stored in the Vault but it's properties are split between two locations: in a platform-specific .ini file that holds the Automatic Password Management settings and in an XML file where the the General Properties and UI and Workflow properties for all platforms are stored. When exporting a platform, the resulting Zip file contains both (though the XML file in the export only includes properties for the relevant platform.)
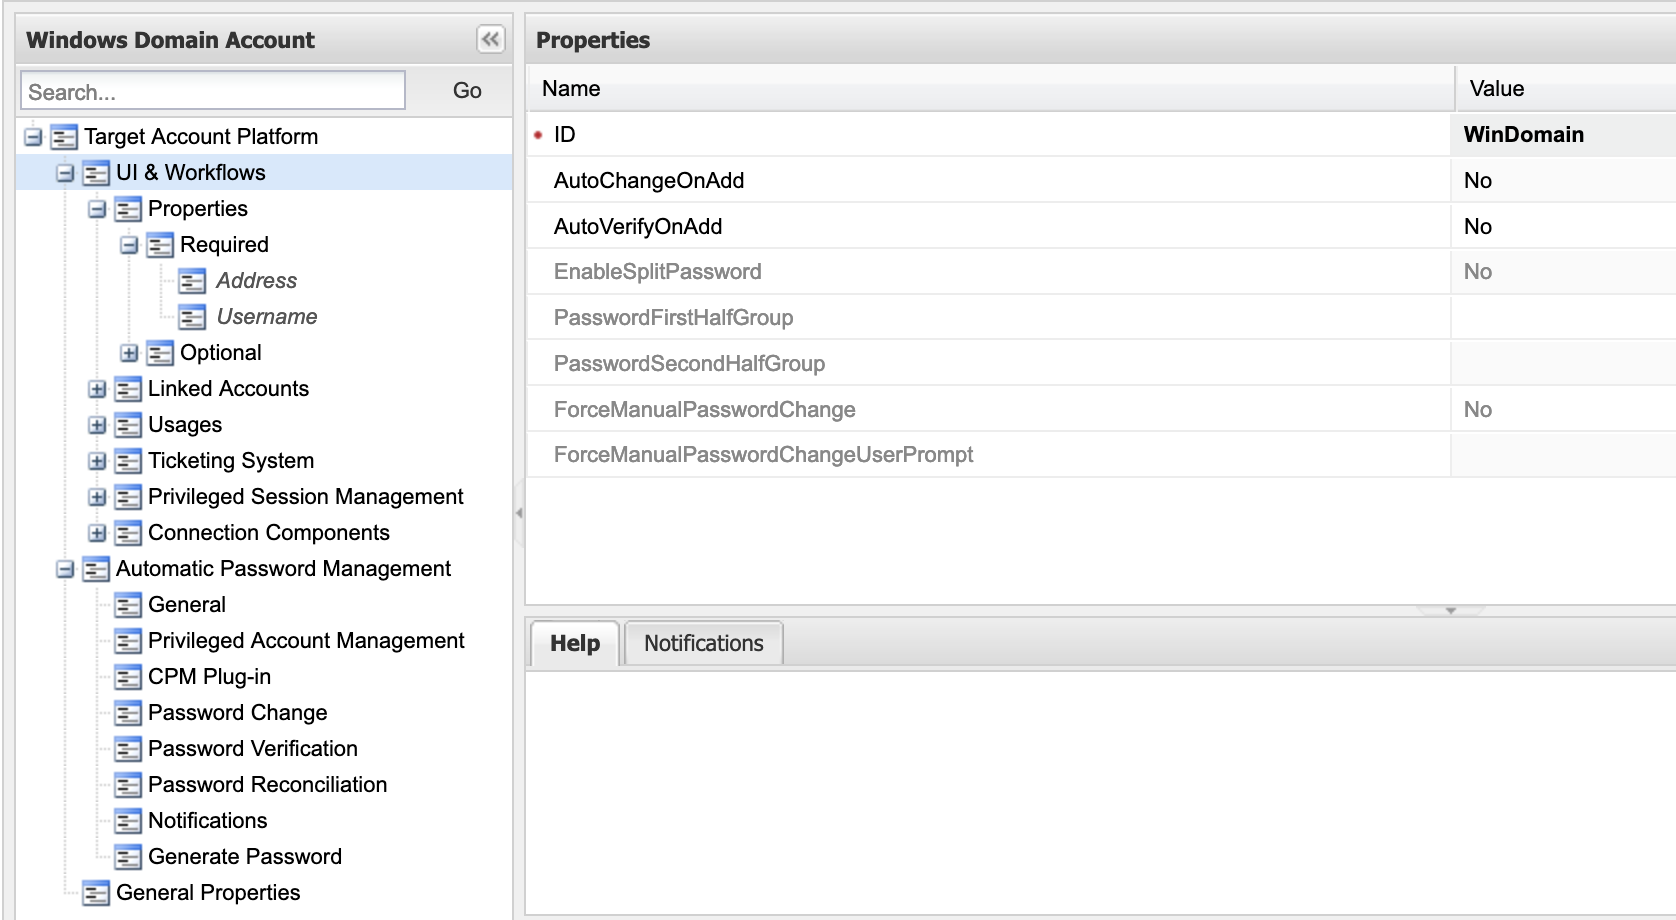
Editing a platform's properties in the PVWA.
General and UI and Workflow properties
The 'General' and 'UI and Workflow' properties for all platforms are all in Policies.xml, which is stored in the PVWAConfig safe. Opening the file and looking at the platform properties, the structure is that of what you would see in the PVWA when editing a platform - minus the Automatic Password Management properties!
<?xml version="1.0" encoding="UTF-8"?>
<Device Name="Operating System">
   <Policies>
      <Policy ID="WinDomain" AutoChangeOnAdd="No" AutoVerifyOnAdd="No" PlatformBaseID="WinDomain" PlatformBaseType="Windows" PlatformBaseProtocol="Windows">
         <Properties>
            <Required>
               <Property Name="Address" />
               <Property Name="Username" />
            </Required>
            <Optional>
               <Property Name="LogonDomain" ResolveFrom="Address" />
               <Property Name="UserDN" />
               <Property Name="Port" />
            </Optional>
         </Properties>
         <LinkedPasswords>
            <Link Name="LogonAccount" PropertyIndex="1" />
            <Link Name="ReconcileAccount" PropertyIndex="3" />
         </LinkedPasswords>
         <Usages>
            <Usage Name="WinService" />
            <Usage Name="SchedTask" />
            <Usage Name="IISAppPool" />
            <Usage Name="Registry" />
            <Usage Name="ComPlus" />
            <Usage Name="IISAnonymous" />
         </Usages>
         <TicketingSystem EnterTicketingInfo="No" ValidateTicketNumber="No" />
         <PrivilegedSessionManagement ID="PSMServer_2ab6ce8" />
         <ConnectionComponents>
            <ConnectionComponent Id="PSM-RDP">
               <OverrideUserParameters>
                  <Parameter Name="PSMRemoteMachine" Type="CyberArk.PasswordVault.Web.TransparentConnection.RemoteMachineUserParameter, CyberArk.PasswordVault.Web" />
                  <Parameter Name="LogonDomain" Type="CyberArk.PasswordVault.TransparentConnection.PSM.LogonDomainUserParameter, CyberArk.PasswordVault.TransparentConnection.PSM" />
               </OverrideUserParameters>
            </ConnectionComponent>
            <ConnectionComponent Id="RDP">
               <OverrideUserParameters>
                  <Parameter Name="RemoteMachine" Type="CyberArk.PasswordVault.Web.TransparentConnection.RemoteMachineUserParameter, CyberArk.PasswordVault.Web" />
               </OverrideUserParameters>
            </ConnectionComponent>
            <ConnectionComponent Id="RDPWinApplet">
               <OverrideUserParameters>
                  <Parameter Name="RemoteMachine" Type="CyberArk.PasswordVault.Web.TransparentConnection.RemoteMachineUserParameter, CyberArk.PasswordVault.Web" />
               </OverrideUserParameters>
            </ConnectionComponent>
            <ConnectionComponent Id="RDPapplet">
               <OverrideUserParameters>
                  <Parameter Name="RemoteMachine" Type="CyberArk.PasswordVault.Web.TransparentConnection.RemoteMachineUserParameter, CyberArk.PasswordVault.Web" />
               </OverrideUserParameters>
            </ConnectionComponent>
         </ConnectionComponents>
      </Policy>
   </Policies>
</Device>
The contents of Policy-WinDomain.xml when exported through the PVWA.
As it is XML, we can leverage native PowerShell cmdlets to update the file to add, update, or delete platform properties.
Automatic Password Management properties
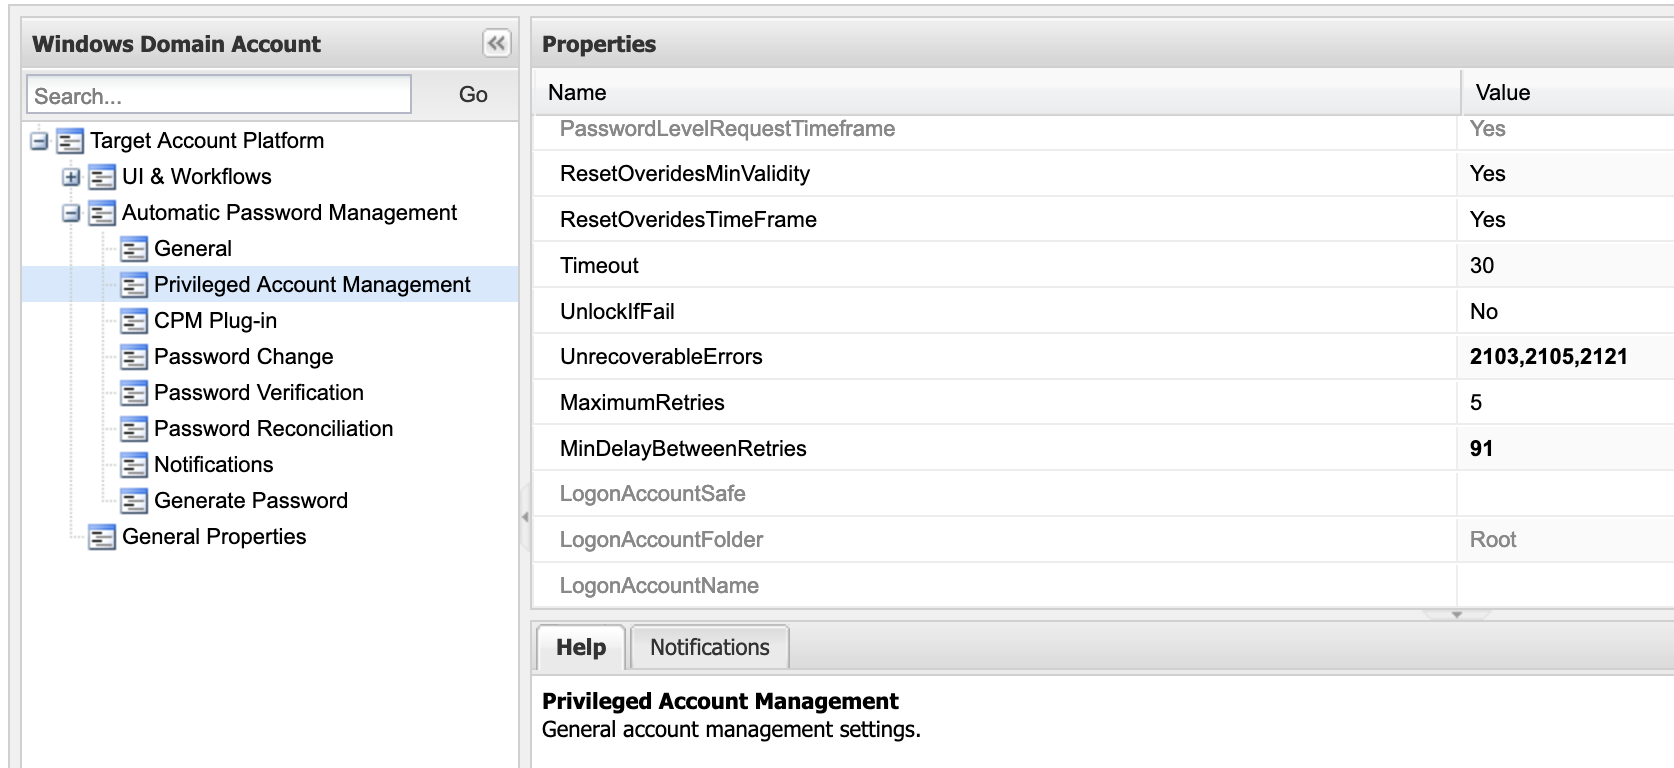
The 'Automatic Password Management' properties are stored in platform-specific .ini files in the PasswordManagerShared safe under the Policies folder.
PolicyID=WinDomain                	;Mandatory
PolicyName=Windows Domain Account
SearchForUsages=Yes             	;Expected values: yes/no
PolicyType=regular              	;Expected values: regular, usage, group
ImmediateInterval=5             	;In minutes
Interval=1440                    	;In minutes
MaxConcurrentConnections=3
AllowedSafes=.*	     			;Regular expression of Safes pattern

;**************************************
;Common Tasks Parameters
;**************************************
MinValidityPeriod=60             	;In minutes (-1 for none)
ResetOveridesMinValidity=yes
ResetOveridesTimeFrame=yes
Timeout=30                       	;In Seconds
UnlockIfFail=no
UnrecoverableErrors=2103,2105,2121      	;Plug-in return codes separated by a comma

;Retries
MaximumRetries=5
MinDelayBetweenRetries=90        	;In minutes
An excerpt from Policy-WinDomain.ini
An .ini file is simply made up of keys and values that are optionally organized into sections. We can write our own code that converts APM properties represented as hashtables or leverage the existing PowerShell library PsIni that will do the same thing.
Updating Automatic Password Management properties
The 'Automatic Password Management' properties of a platform are the easiest to update. You retrieve the .ini file from the PasswordManager_Shared safe, change the properties you are interested in, and store the updated .ini file back in the Vault. Here is how we can edit the properties using PowerShell and PsIni, changing the minimum delay in minutes between retries in the WinDomain platform as an example use case:
With PsIni already being installed and imported we get the content of the platform's .ini file.
PS > $PlatformIni = Get-IniContent ./Policy-WinDomain.ini
We can see the sections and the first few properties.
PS > $PlatformIni

Name                           Value
----                           -----
_                              {Comment1, Comment2, Comment3, Comment4…}
ExtraInfo                      {}
Note that when a property is not defined a section in the .ini file then PsIni treats that property as living under the section _.
PsIni converts each section to an OrderedDictionary so we get all the properties quite easily.
PS > $PlatformIni['_']

Name                           Value
----                           -----
Comment1                       ; This is a sample policy parameter file for managing Windows Domain account.
Comment2                       ;
Comment3                       ; The following properties are required on password objects that are related to this po…
Comment4                       ;
Comment5                       ; PolicyID=WinDomain           ;Required
Comment6                       ; UserName                     ;Required. Windows user name
Comment7                       ; Address                      ;Required. Windows domain address (IP/DNS)
Comment8                       ; ExtraPass3Safe*              ;Required if reconciliation task is active.
Comment9                       ; ExtraPass3Folder*            ;Required if reconciliation task is active.
Comment10                      ; ExtraPass3Name*              ;Required if reconciliation task is active.
Comment11                      ;* Can be specified in the password object property or in Reconciliation task section w…
PolicyID                       WinDomain                	;Mandatory
PolicyName                     Windows Domain Account
SearchForUsages                Yes             	;Expected values: yes/no
PolicyType                     regular              	;Expected values: regular, usage, group
ImmediateInterval              5             	;In minutes
Interval                       1440                    	;In minutes
MaxConcurrentConnections       3
AllowedSafes                   .*	     			;Regular expression of Safes pattern
Comment12                      ;**************************************
Comment13                      ;Common Tasks Parameters
Comment14                      ;**************************************
MinValidityPeriod              60             	;In minutes (-1 for none)
ResetOveridesMinValidity       yes
ResetOveridesTimeFrame         yes
Timeout                        30                       	;In Seconds
UnlockIfFail                   no
UnrecoverableErrors            2103,2105,2121      	;Plug-in return codes separated by a comma
Comment15                      ;Retries
MaximumRetries                 5
MinDelayBetweenRetries         90        	;In minutes
Using Set-IniContent we are able to pass a hashtable with the name of the property and value we want to set.
PS > Set-IniContent -InputObject $PlatformIni -Sections '_' -NameValuePairs @{'MinDelayBetweenRetries' = '91'}

Name                           Value
----                           -----
_                              {Comment1, Comment2, Comment3, Comment4…}
ExtraInfo                      {}

PS > $PlatformIni['_']['MinDelayBetweenRetries']
91
It is important to note that $PlatformIni has the new value but not yet Policy-WinDomain.ini. We need to use Out-IniFile to save our platform's new property values to Policy-WinDomain.ini. We also pass the -Force parameter to overwrite the existing .ini file as it needs to be named Policy-<PlatformId>.ini.
PS > Out-IniFile -InputObject $PlatformIni -FilePath ./Policy-WinDomain.ini -Force
We are almost ready to upload the modified .ini to the Vault but first we need to ensure that the file has no byte order mark (BOM.). A BOM is a usage of a specific Unicode character at a start of text that can be used by a program reading the text to know the byte order of the text, re-enforce the fact that the text encoding is Unicode, and which Unicode text encoding is used.
This sounds useful but if the BOM is included in the platform's .ini then the CPM will fail (silently) to read the modified .ini file and use the new property values. We can strip the BOM with a single line:
PS > Get-Content ./Policy-WinDomain.ini | ForEach-Object { $_ -replace '\xEF\xBB\xBF','' } | Set-Content ./Policy-WinDomain.ini
At this point we can upload our platform's new .ini file to the PasswordManager_Shared safe and when we look in the PVWA we can see the new value.
Updating General or UI and Workflow properties
Updating the 'General' and 'UI and Workflow' properties is more complex than the Automatic Password Management properties only because working with XML in PowerShell is not as easy as an .ini file. It requires general knowledge of XML and you have an advantage if you are already comfortable with XPath.
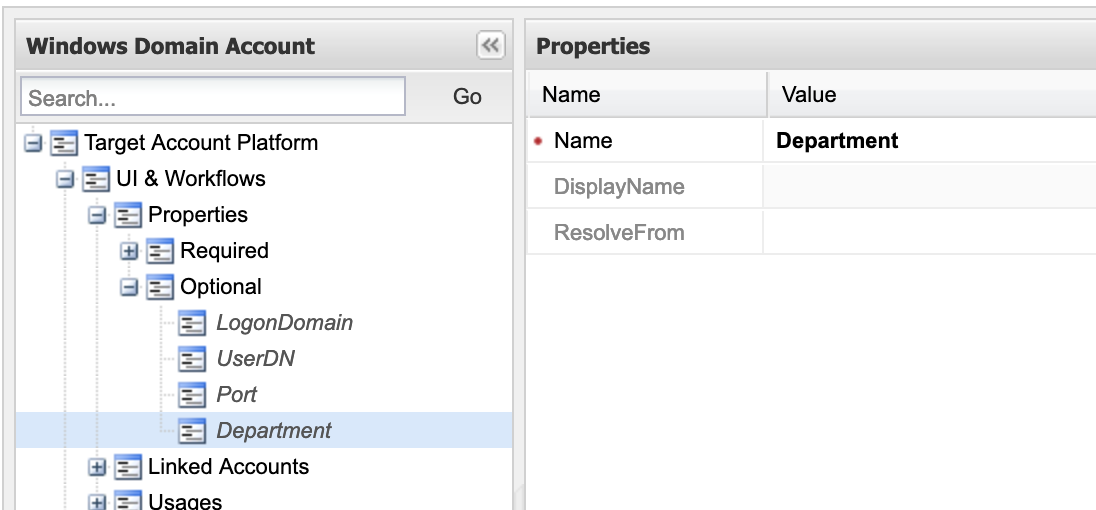
Similar to what we did for the APM properties in the .ini file, we need to retrieve Policies.xml from the PVWAConfig Vault, then add, update, or delete the XML element that represents the property we want to make in the section of the file for the platform we want to change, and store the updated Policies.xml back in the Vault. Here is how to do it with PowerShell and it's native XML cmdlets, adding a new optional 'Department' property to the WinDomain platform as an example use case:
We need to get the content of the XML file and cast it to an XmlDocument object.
PS > $PoliciesXml = [xml](Get-Content ./Policies.xml)
Now we want to select the node where the new optional property will be added. Using XPath, we can pinpoint the location effortlessly.
PS > \(OptionalPropertiesNode = \)PoliciesXml.SelectNodes("//Policy[@ID='WinDomain']/Properties/Optional")
Explaining XPath is beyond the scope of this post but the quick and dirty explanation is using XPath we are selecting all nodes in the XmlDocument object that live under an Optional section, that is under a Properties section, that live under a Policy section that has the ID of WinDomain.
We need to create a new Property element with a Name attribute that has the value of Department.
PS > \(DepartmentProperty = \)PoliciesXml.CreateElement('Property')
PS > $DepartmentProperty.SetAttribute('Name', 'Department')
The element representing our new optional Department property has been created but we still need to add it to the Optional Properties section in the XML.
PS > \(OptionalPropertiesNode.AppendChild(\)DepartmentProperty)
Similar to when we changed the APM properties, only the XmlDocument object has been modified and not the Policies.xml on our local machine. We need to save our modified $PoliciesXml object back to an actual file.
PS > $PoliciesXml.Save('Policies.xml')
At this point we can upload our new Policies.xml to the Vault but unlike the CPM, the change we made will not be recongized until we make a change to any platform in the PVWA. Editing and saving a platform in the PVWA seems to trigger the PVWA to apply all properties for all platforms defined in Policies.xml and not just what was changed in the interface. Afterwards we can see our new property.
Taking it to the next level
In the examples we only changed a single platform and the effort to do it with PowerShell versus by hand in the PVWA does not make sense. We can tweak the code to change all platforms but it still requires being familiar with the structures of the two different files, and in the case of the ‘General’ and ‘UI and Workflow’ properties being comfortable with XML and XPath, and it can still be error prone when editing the files directly where uploading malformed platform files could have unintended consequences. And as we might need to do this again, creating our own PowerShell commandlets with unit tests makes the most sense.
I already created two PowerShell commandlets — one for editing the APM properties and one for editing General and UI and Workflow properties — available in the Git repository below. Get help and examples on using the cmdlets by using PowerShell’s Get-Help cmdlet.