Installing and configuring Utimaco's SecurityServer Simulator
In a previous blog where I integrated a HSM with the CyberArk (now Idira) Vault using Utimaco's SecurityServer simulator, I did not touch on at all how to install and configure it but this is arguably the toughest part of the integration.
Though the documentation from Utimaco is comprehensive, the sheer amount can be overwhelming so in this post I want to show how the Utimaco SecurityServer simulator can installed and configured. We will then configure Utimaco PKCS#11 provider DLL on a client, using a CyberArk Vault as an example.
Installation and configuration of the SecurityServer simulator
Requirements
You will need:
The Utimaco SecurityServer simulator. You can only download it after you register for an account in the Utimaco portal. As the simulator is meant for commercial evaluation, you should sign up with your business contact details. You may need to wait up to 48 hours until the account is activated.
A Windows server with a Java Development Kit installed with the Zip archive downloaded from the Utimaco portal.
Installing the simulator
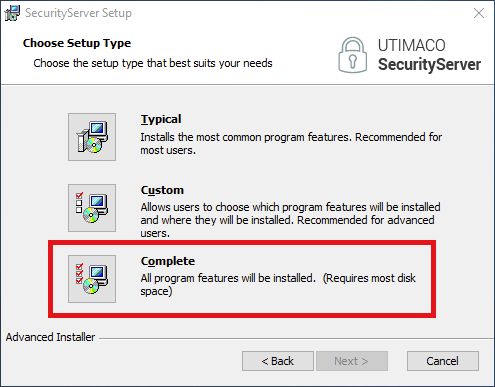
Installing the simulator is as simple as using the .msi provided in the Zip archive but be sure to choose a Complete setup type otherwise the tool needed to initialize the HSM slots will not be installed.
After installation, you will have three new icons on your desktop:
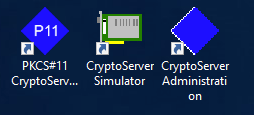
We only need the CryptoServer Simulator and the PKCS#11 CryptoServer Administration applications. If you do not see the PKCS#11 CryptoServer Administration then you did not install the Complete setup type as part of the installation.
Configuration the provider and initializing the slots
The simulator is our HSM. Double clicking the CryptoServer Simulator icon starts the simulator and this needs to run continuously. The PKCS#11 CryptoServer Administration tool is only used to initialize the token and slots.
Just like a client uses the PKCS#11 provider DLL to communicate with the HSM, so does the PKCS#11 CryptoServer Administration tool. The PKCS#11 provider DLL uses a configuration file -- cs_pkcs11_R3.cfg -- to know the location of the HSM. We need to change the cs_pkcs11_R3.cfg to point to the simulator running on the same server plus enable some logging for easier troubleshooting.
The provider DLL knows where to find cs_pkcs11_R3.cfg based on the value of the system environmental variable CS_PKCS11_R3_CFG. This is automatically created as part of the installation and the default location is C:\ProgramData\Utimaco\PKCS11_R3\cs_pkcs11_R3.cfg.
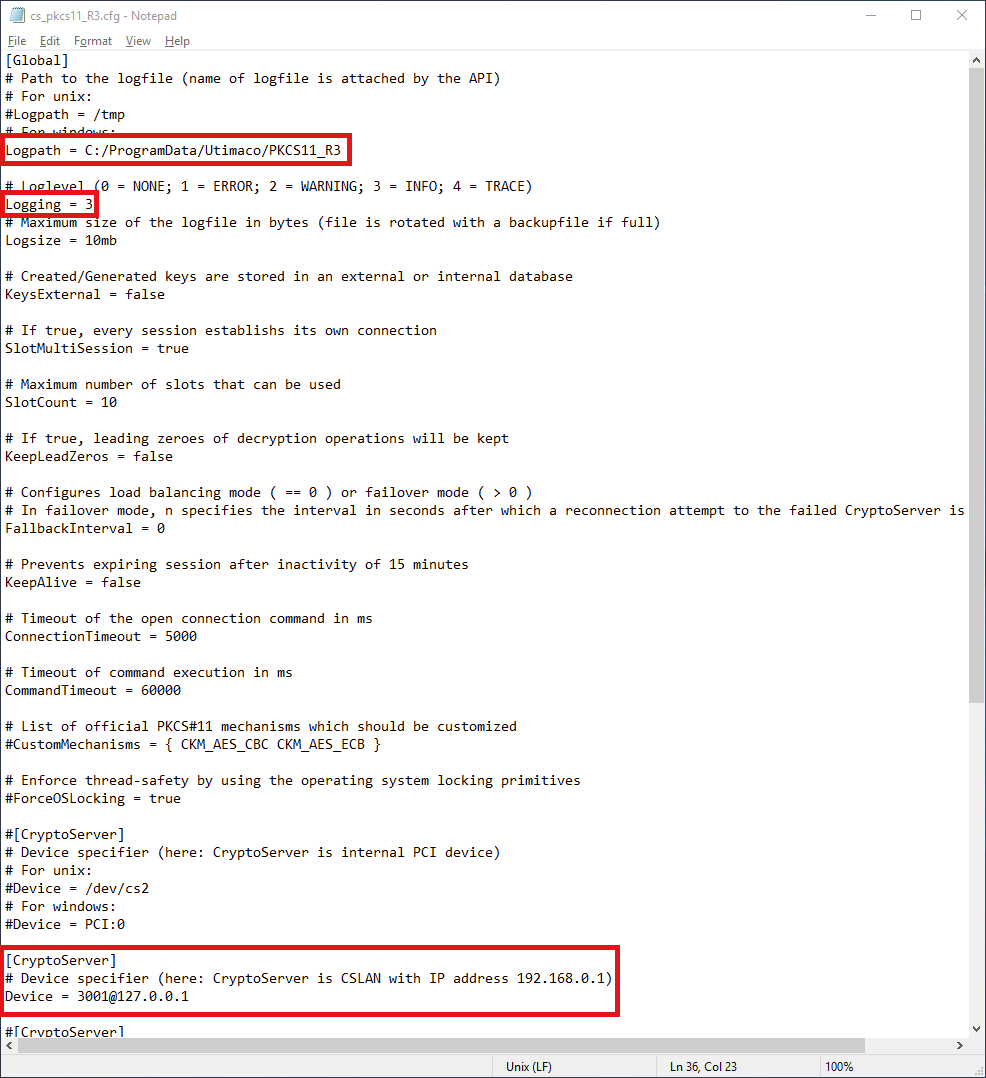
Opening C:\ProgramData\Utimaco\PKCS11_R3\cs_pkcs11_R3.cfg we want to change three things: enable the PKCS#11 provider to write logs in the same directory as the configuration file, change the log level to INFO, and define the address of the ‘device’ the provider connects to -- in our case, the locally-running simulator.
Change the following settings to have the following values, uncommenting the settings as necessary:
Logpath = C:/ProgramData/Utimaco/PKCS11_R3Logging = 3Under a
[CryptoServer]section that is uncommented, setDevice = 3001@127.0.0.1
Save the changes.
With the the CryptoServer Simulator running, open the PKCS#11 CryptoServer Administration tool. Ten slots should be shown on the left.
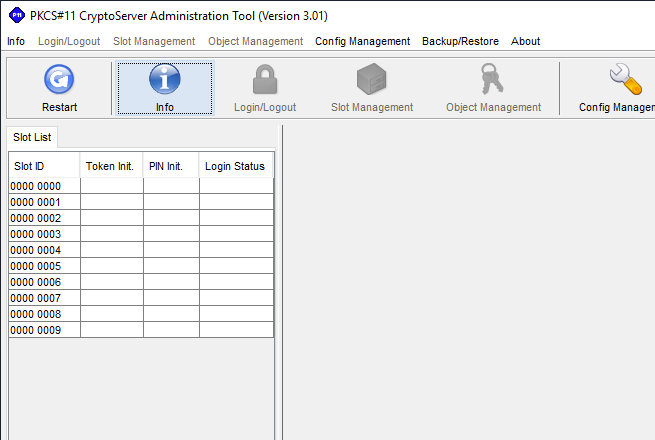
Click on the first slot, Login/Logout at the top, and click Login Generic. Type in ADMIN as the username, select Keyfile as the authentication token, and define C:\Program Files\Utimaco\SecurityServer\Administration\ADMIN.key as the Keyfile. Do not define a password.
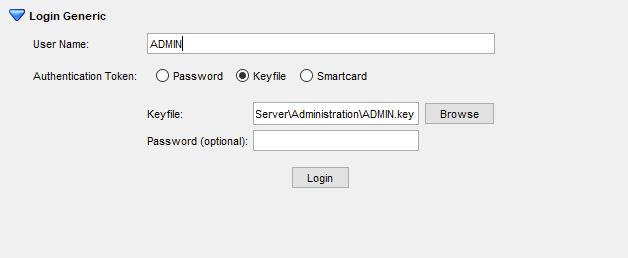
NOTE: In the latest versions of the SecurityServer, complexity requirements are being enforced for the SO and User PIN. Use strong passwords as the PINs for both the SO and User.
Once logged in, the token needs to be initialized by setting the SO PIN. Click Slot Management at the top, expand Init Token, and set the SO PIN and Confirm SO PIN and click Init Token. In the Status pane, you will see the message Slot 0000 0000: Token initialized.
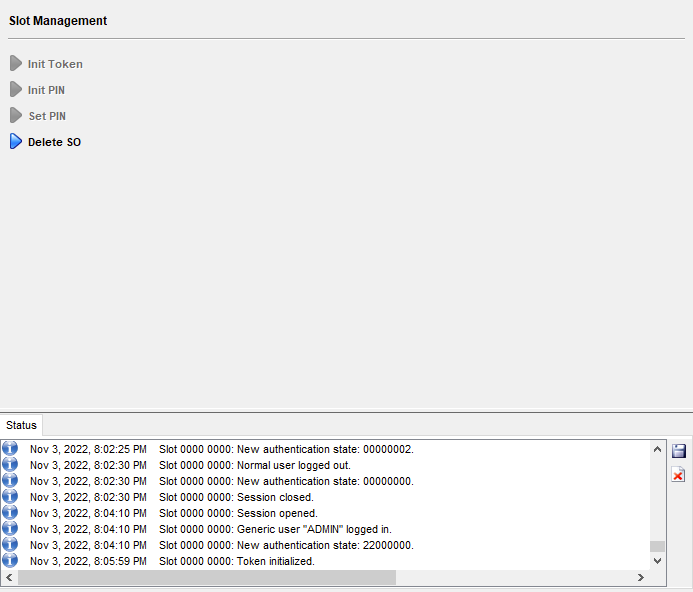
With the slot's token initialized, we then login with the SO PIN and initialize (another, separate PIN.)
As you can only be logged in with a single user at a time, hit Login/Logout, click the Logout All button, click on Login/Logout once more, and login with the SO PIN. After successful login with the SO PIN, click on Slot Management at the top and expand Init PIN. Define both Normal User PIN and Confirm Normal User PIN. This is the PIN that will be secured with CAVaultManager SecureSecretFiles when defining HSMPinCode in the dbparm.ini and used clients to access the Server key. Non-CyberArk Vault clients will also use a PIN when needing to access keys.
After initializing the PIN, log out once more by clicking Login/Logout and then clicking Logout All. Login as User by clicking on the Login/Logout button, expanding Login User, and logging in with the Normal User PIN you defined previously.
After successful authentication with the Normal User PIN, the Object Management button at top is clickable. Any cryptographic information (symmetric/asymmetric keys) will show up as an object in this pane but as we just initialized the PIN, it is empty.
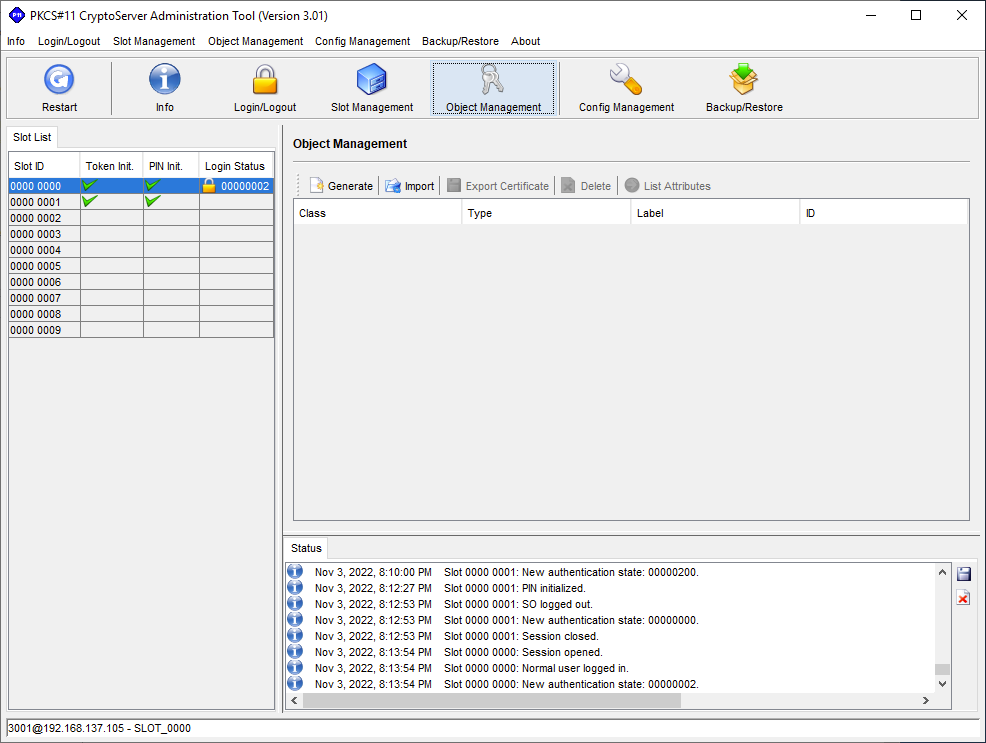
We can generate our own keys by clicking Generate. In the case of integration with the CyberArk Vault, we will do it as part of CAVaultManger GenerateKeyOnHSM /ServerKey.
Setting up the CS PKCS#11 Provider on the CyberArk Vault
In order to use the HSM from another client, we need the PKCS#11 provider DLL and the configuration file -- just like we have it on the server running the simulator.
With the CyberArk Vault as our client, in order to use the SecurityServer simulator as our HSM, we need to:
On the server running the SecurityServer simulator, allow inbound traffic on port
3001/tcp.Copy
cs_pkcs11_R3.dllto the Vault. This can be found in the Zip archive in theSoftware\Windows\x86-64\Crypto_APIs\PKCS11_R3\lib\folder.Copy
cs_pkcs11_R3.cfgto the Vault.Update
cs_pkcs11_R3.cfgto reflect the proper paths on the Vault.Define the system environmental variable
CS_PKCS11_R3_CFG.
Configuring the CyberArk Vault
On the server running the SecurityServer simulator, add a rule that allows inbound traffic over 3001/tcp. In a PowerShell opened as Administrator, run New-NetFirewallRule -DisplayName "SecurityServerSimulator" -Direction Inbound -LocalPort 3001 -Protocol TCP -Action Allow.
On the Vault server, create the HSM folder under C:\Program Files (x86)\PrivateArk\Server. Copy cs_pkcs11_R3.dll, and cs_pkcs11_R3.cfg into C:\Program Files (x86)\PrivateArk\Server\HSM.
Open cs_pkcs11_R3.cfg and set the following:
Logpath = C:\Program Files (x86)\PrivateArk\Server\HSMUnder a
[CryptoServer]section that is uncommented, setDevice = 3001@<ip of the server running the SecurityServer simulator>SlotCount = 1
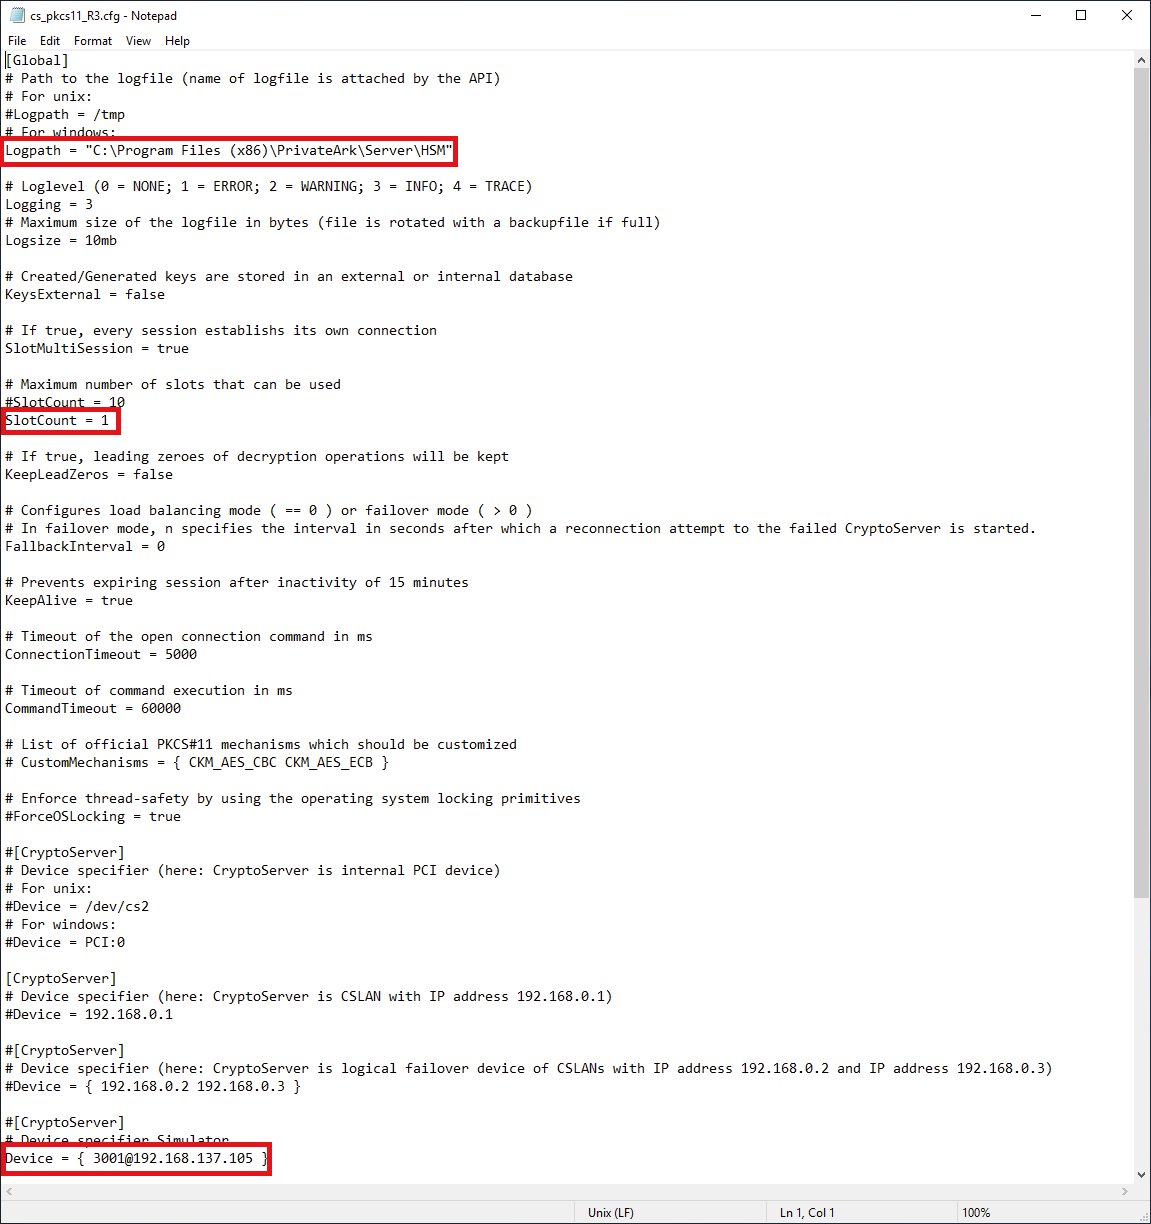
Now edit the system environmental variables and add CS_PKCS11_R3_CFG with a value of C:\Program Files (x86)\PrivateArk\Server\HSM\cs_pkcs11_R3.cfg
At this point the PKCS#11 provider is configured. The easiest way to test connectivity is trying to generate a Server key with CAVaultManger GenerateKeyOnHSM /ServerKey after performing the initial Vault configurations for HSM integration.
Closing notes
If you are having trouble, do not forget to look in the
cs_pkcs11_R3.logfile. Together with error messages returned by the client using the PKCS#11 provider DLL, the log contains useful information.Utimaco is the only vendor I have seen provide something like the SecurityServer simulator to the public. If you are in search of a HSM solution, consider checking out their offerings as a way to say 'thanks.'
About the author
- Originally from the USA, working in Amsterdam, Netherlands in the digital identity space.
Comments
Join the discussionHi, thanks for this post! I initially set up the HSM using your write-up. Recently I have upgraded to v4.70.0.0, and I am getting CKR_PIN_TOO_WEAK when I am trying to set user PIN, regardless how complex the PIN is. What is the password policy for User PIN?
I don't know the password policy offhand but trying to remember when I did this, I used a complex password instead of a 'traditional' PIN to get around this.
Tim Schindler Thanks for your reply. I did the same with password and in fact generated >100 characters passwords as well as passphrases. However, none of those helped. I think it might be a bug.
CyberArk and HSM integration
Posts covering integrating CyberArk with a hardware security module (HSM) with Utimaco's SecurityServer simulator as the HSM.