


Unlike their platform package counterparts, packages for connection components (also referred to as Universal Connectors or just connectors in the CyberArk documentation) are not well documented. But with what is provided in the documentation, as well as stitching together the sample connection component package and the packages from the CyberArk Marketplace, we can get a decent idea of what the features and requirements are.
P.S.: I developed a PowerShell function that creates a package ready for import. It creates the optional package.json and connection component settings as well! Find it on GitHub:
What is a Universal Connector package?
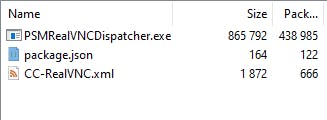
It is simply a Zip archive containing the connection component files and optionally two more files: a package.json file that contains client application file paths to have AppLocker rules created based off of and a .xml file with the settings of the connection component. Based on what is included in the package, the connection component is deployed to all the PSMs in the environment, AppLocker rules are updated on each PSM, and the connection component settings are added to CyberArk.
Packages are imported one of three ways: either through the Import connection component REST API endpoint, through the PVWA, or by directly uploading to the PSMUniversalConnectors safe through the PrivateArk client.
Connection component files
This consists of the connection component itself (typically, a compiled AutoIT executable) and any supporting files (libraries as a .dll, for example.)
package.json
The optional package.json file consists of two things: the name of the package it is included with (seems to be the ID of the connection component) and the ClientAppPaths property. It must be in the root of the package archive.
{
    "PackageName": "PSM-RealVNC",
    "ClientAppPaths":[
        {
            "Path":"C:\Program Files\RealVNC\VNC Viewer\vncviewer.exe"
        }
    ]
}
An example of a package.json for the PSM-RealVNC connection component.
The ClientAppPaths array contains one or more Path properties with the value being a path belonging to the application for the connection component. Along with every connection component file that is an executable (ending with .exe), these files are added to the existing AppLocker rules on each PSM.
Notice that the value for the Path property is not escaped. Strangely, the deployment process that reads the package.json assumes the paths are unescaped and will escape them as part of the process. If you escape the paths, the process will fail!
If no package.json is included in the package archive, all connection component executables will still be added to the existing AppLocker rules.
Connection component settings
Another optional file is the connection component settings represented in an XML file. The file needs to be named CC-<connection component ID>.xml and sit in the root of the package archive.
<ConnectionComponent Id="PSM-RealVNC" FullScreen="No" Height="768" Width="1024" EnableWindowScrollbar="No" EnableToolbars="No" DisplayName="RealVNC" Type="CyberArk.PasswordVault.TransparentConnection.PSM.PSMConnectionComponent, CyberArk.PasswordVault.TransparentConnection.PSM">
<ComponentParameters />
<UserParameters>
<Parameter Name="AllowMappingLocalDrives" Type="CyberArk.TransparentConnection.BooleanUserParameter, CyberArk.PasswordVault.TransparentConnection" Value="Yes" Visible="Yes" Required="Yes" EnforceInDualControlRequest="No"/>
<Parameter Name="FullScreen" DisplayName="Real VNC Full Screen" Type="CyberArk.TransparentConnection.BooleanUserParameter, CyberArk.PasswordVault.TransparentConnection" Value="Yes" Visible="Yes" Required="Yes" EnforceInDualControlRequest="No"/>
</UserParameters>
<TargetSettings Protocol="VNC" ClientApp="NA" ClientDispatcher=""{PSMComponentsFolder}\PSMRealVNCDispatcher.exe" "{PSMComponentsFolder}"" ClientInvokeType="Dispatcher" ConnectionComponentInitTimeout="20000">
<ClientSpecific>
<Parameter Name="WaitBeforeCmdlineParmsHide" Value="2000" />
<Parameter Name="CmdLineParmsHideTimeout" Value="2000" />
<Parameter Name="WinWaitTimeout" Value="30" />
<Parameter Name="AuthenticationType" Value="VNC" />
<Parameter Name="ClientExecutable" Value="C:\Program Files\RealVNC\VNC Viewer\vncviewer.exe" />
<Parameter Name="IdentityCheck" Value="Enforce" />
<Parameter Name="IdentityCheckWinWaitTimeout" Value="3" />
<Parameter Name="ContinueOnWarning" Value="Yes" />
</ClientSpecific>
<LockAppWindow Enable="No" MainWindowClass="Authentication" Timeout="20000" SearchWindowWaitTimeout="30" />
<Capabilities>
<Capability Id="KeystrokesAudit" />
<Capability Id="KeystrokesTextRecorder" />
</Capabilities>
</TargetSettings>
</ConnectionComponent>
The connection component settings XML file taken from the PSM-RealVNC connection component package, available in the CyberArk Marketplace.
The format is exactly the same you would find in the PVConfiguration.xml, which holds a majority of the overall CyberArk settings you see in the PVWA and all of the platform-independent connection component settings. You can simply create and configure the connection component settings in your pre-production environment and copy and paste them into it's own file to be included in the package archive. This file only seems to be recognized when importing the package via the API endpoint or the PVWA. The settings in this file do not seem to be merged into the overall configuration when the package is uploaded directly to the PSMUniversalConnectors safe.
In addition to the PVWAConfig safe, PVConfiguration.xml can be found on many of the components themselves -- including the PSM under C:\Program Files (x86)\CyberArk\PSM\Temp.
Putting it all together
Once you have the files you are going to include, you simply zip them together. Whereas the connection component files do not need to sit in the root of the package, the optional package.json and the XML for the connection component settings do.
Scripting it with PowerShell!
Creating a package is pretty simple once we know what needs to be done and how. Together with knowing some of the weird exceptions (for example, requiring unescaped Paths in package.json which result in malformed JSON object literals that do not play nice with serializers and de-serializers) we can script this all out.
I developed a PowerShell function New-PASConnectionComponentPackage that creates a package ready for import through the CyberArk REST API / PVWA or via direct upload into the Vault. It will create the optional package.json which helps generate the AppLocker rules plus extracts a connection component's settings out of an existing PVConfiguration.xml and adds it to the archive.
Here is an example usage of it:
New-PASConnectionComponentPackage `
    -ConnectionComponentId PSM-SampleApp `
    -Path C:\SampleAppDispatcherFiles `
    -ConnectionComponentApplicationPaths @('C:\SampleApp\SampleApp.exe') `
    -CreateConnectionComponentXmlFile $true `
    -PVConfigurationPath 'C:\Program Files (x86)\CyberArk\PSM\Temp\PVConfiguration.xml' `
    -DestinationPath C:\ConnectionComponentPackages
Find it on GitHub: